Rose is a very beautiful flower that can become a worthy decoration for any interior. You can collect a rose on a stem and place it in a vase. You can fold some buds and use them as a decorative element. Or you can simply please the kids with a beautiful craft. So, you will learn very soon how to make an original rose using the origami technique from plain paper, if you want to work with your own hands.
There are many options for assembling these flowers. For example, the diagram is in Russian. However, these instructions are not always completely clear. Master classes convey information better and help achieve the desired result.
A simple version of a paper rose using the origami technique
You need colored double-sided A4 paper. You will also need scissors and glue.
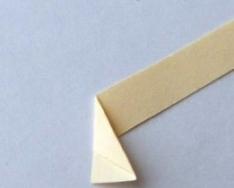
Cut a strip 1 cm wide along the long side. Fold the corner.
Fold it again like this.

Once again you need to bend the corner.

Holding the end of the strip, make one turn.

This way.

Now you need to twist the rosette, making folds all the time, as in the beginning.

Continue in this manner until the end of the strip.

Glue the tip of the paper to the flower. Do the same with the leg by which the rose was held during the assembly process.

You will get this beauty:

You can varnish the finished product or sprinkle it with glitter.

You can also take the wire and wrap it in green paper. You will get a bouquet of roses like this.

This model is well suited for beginners and children.
A more complex rose for more experienced craftsmen
For this craft you need a square of paper, no larger than 10x10 cm. The sheet is folded in half.

Then in half again.

The top side of the paper is flattened into a triangle.

Now the workpiece needs to be turned over. And on this side, fold the paper into a triangle, as before.

The right and left corners on one side are bent upward, into a rhombus.

These same corners are bent in half downwards and unbent back.

The small triangles that make up the rhombus need to be flattened, like this.

Bend the resulting pockets in half, down.

Do the same on the other side. It will turn out like this.

Bend the top corner down, making a fold and bend it back.

Open the lower part of the blank like a book.

Attention! Pull the areas shown in the picture and flatten. You should end up with two triangles in a square.


Turn the workpiece over.

Lift the triangle up by pulling it.

The lower right square must be folded diagonally, from top to bottom.


Turn the workpiece 180 degrees and bend the lower right square again.

Place the almost folded flower on your left hand. Grasp the walls of the workpiece with your right hand and twist clockwise. The result will be a rose. You can also help with your left hand. Wrap the corners around the pencil, twisting them slightly.
This is what the flower will look like:

It looks good on a scrapbooking-style card, on gift wrapping, or in a glass vase where you can place several roses of different colors at once.
Model of modules according to diagrams with a description of work
This option is more complicated, but the flower looks very delicate and beautiful.
You need to prepare squares of colored paper, 8 or 15 pieces, depending on how many layers there will be in the rose, two or three. And also glue, because this is a modular assembly.
The square is folded in half, a fold is made and the sheet is unfolded back.

Turn the angle up like a diamond. Take the right corner and fold it inward, along the line of the fold made before.

Also bend the left corner.

Using a pencil, twist the corner a little. The petal module is ready.

The first row is made up of 3 petals. You need to apply a drop of glue to the left corner of one petal and the right corner of the other.

Like this:


Now the three glued petals need to be connected into a circle. Like this.


The first row is ready.

The second row consists of 5 petals. First glue at the top, then turn it over and glue at the bottom.


The rose is, without a doubt, one of the most beautiful flowers in the world, which is why it is very popular.
A paper rose is no less attractive than a real one, and the fact that you make a beautiful flower with your own hands, makes the rose even more meaningful to the person you give it to.
Learn making a paper rose is not difficult. There are many ways to do this, and you will learn about several from us.
How to make a rose with your own hands. The easiest way.
You will spend very little time on the rose in this example, but will get a lot of pleasure. Such flowers can be used as decor in an apartment or as a symbolic handmade gift.
You will need:
Thick paper
Scissors
Beautiful vase
1. From thick paper you need to cut out a square measuring 10x10 cm.
*The color of the paper depends on the color of the rose you will be making.
2. Draw a spiral on the square (see picture).
3. Cut out the drawn spiral.


4. Start rolling the paper spiral starting from the outer end.
5. Screw the bud tightly to the end and glue the inner end to strengthen the structure.


The rose is ready, and you need to start making leaves for it.
6. Cut out a leaf and glue it to the rose.


To make the rose look more chic, place it in a beautiful vase.
How to make a paper rose. Method II
You will need:
Thick paper
Scissors
Glue (adhesive tape)
1. Fold a sheet of A4 paper in half, and then in half again.


2. Now you need to cut the sheet into 4 strips. To do this, unfold it and cut along the folds.
3. Use duct tape to hold the cut strips end-to-end together, creating one long strip.


4. The strip that you have obtained needs to be twisted so that you get a rod-trunk (see picture).
5. You now need to fold the remaining part of the paper in half, while slowly turning it around the center (see picture). Continue wrapping and gathering layers until you have a rose.


*If you wish, you can paint the rose with your favorite color if you made it from white paper.
How to make a rose. Method III

You will need:
Crepe paper (red and green)
Stick, skewer or wire
Pencil
Scissors
Floral tape or glue
1. Make a heart shaped template. The size of the template depends on the size of the flower. In this example, the height of the heart is 15 cm.

2. Cut out 5-6 hearts according to the template.


3. Making a stem. Prepare 3 wires or a stick and wrap it with floral tape.
* Floral tape can be replaced with glue.

4. Making petals. Gently stretch the paper wide. Wrap the top edge of the heart around the round handle.


Wrap the first petal around the stem and secure it with ribbon.

Do the same with the remaining petals.

5. Making leaves. Prepare 3 wires and wrap them in crepe paper. Next you need to glue the leaves to them, which must be prepared in advance.

6. Making a rose cup. Cut a strip of green crepe paper.

Attach the strip to the base of the cup using adhesive tape (you can replace it with glue).

Attach leaves to the stem. Make one common stem and decorate it with green crepe paper.


Paper rose. Method IV

You will need:
Printable template
Printer
Scissors
Stick, toothpick, skewer or wire
Pencil
1. To make such a paper rose you need to download a flower template
Scheme on how to make a rose

2. After which you printed out the template, cut out the petals and leaves.
* Take a close look at the template, where all the petals and leaves are numbered.

3. Use scissors to bend the ends of the petals on both sides.
4. Three green leaves also need to be bent in half lengthwise.

5. Prepare a toothpick, thin wire, stick or skewer and twist petal number 1 around it. Use glue to secure everything.

6. Now around twisted petal number 1 you need to wrap petals number 2 and 3 and also secure with glue.

7. You need to glue petals 4, 5, 6, 7 together to make something similar to cones (see photo).

8. Collect and glue all the parts of the flower together!

You can find roses in other colors by clicking on the links below.
DIY paper roses. Method V
Like the previous roses, this one can be made in any color. The example shows the color red.
1. Prepare colored cardboard. Draw a spiral on it. Try to make the line that you draw from the center to the periphery not even, but a little wavy.
2. Using scissors, make a cut along the entire drawn line. You should get something similar to the peel of a peeled apple.
3. Now you need to wrap your spiral around your pencil. Try to wrap tightly until you reach the middle. After this, you need to remove the pencil and let the flower straighten out.
* Using your fingers, you can try to slightly bend the paper petals in the central part.
4. Apply a lot of glue in the center and let it flow into the central part of the spiral. In order for the glue to set well, you need to press the entire structure to the bottom.
DIY corrugated rose
You will need:
Corrugated paper (pink and green)
Scissors
Wire (straightened paperclip or skewer)
1. Prepare pink or red corrugated paper and fold it several times, first lengthwise and then widthwise.
2. Using scissors, cut out what looks like double petals, shaped like hearts. In this way, you can make 8 petals at once with one cutout.
* In the video, the petals are simply cut out of paper, but you can first draw them on it and then cut them out.
3. Each group of petals should be slightly crushed to give more naturalness. You can stretch it by pressing your fingers into the middle part.
4. Now you need to cut a strip 3 cm wide from a roll of corrugated paper (choose the length yourself, based on the video tutorial). Apply glue along the strip.
5. You need to put a short length of wire at one end of the tape (you can replace it with a straightened paperclip or skewer) and wrap the entire strip around it. This way you will get the core of the rose. It is to this that you will further glue the petals.
6. All that remains is to apply glue to the petals and attach them to the central part.
7. At the final stage, you need to make leaves from green paper. To do this, fold the green crepe paper in half and half again, and cut the shape of the petals as shown in the video.
* In the video, a foam rubber strip is pressed against the wire, and then green paper is wrapped around the wire along with the foam rubber.
Origami rose Kawasaki (video)
This method of making a paper rose was invented by Kawasaki, after whom it is named.
How to make a rose from a napkin (video)
Origami rose from a napkin (video)
Rose is a very beautiful flower that can become a worthy decoration for any interior. You can collect a rose on a stem and place it in a vase. You can fold some buds and use them as a decorative element. Or you can simply please the kids with a beautiful craft. So, how to make an origami paper rose with your own hands?
There are many options for assembling these flowers. For example, the diagram is in Russian. However, these instructions are not always completely clear. Master classes convey information better and help achieve the desired result.
Simple option
You need colored double-sided A4 paper. You will also need scissors and glue.
Cut a strip 1 cm wide along the long side. Fold the corner.
Fold it again like this.

Once again you need to bend the corner.

Holding the end of the strip, make one turn.

This way.

Now you need to twist the rosette, making folds all the time, as in the beginning.

Continue in this manner until the end of the strip.

Glue the tip of the paper to the flower. Do the same with the leg by which the rose was held during the assembly process.

You will get this beauty:

You can varnish the finished product or sprinkle it with glitter.

You can also take the wire and wrap it in green paper. You will get a bouquet of roses like this.

This model is well suited for beginners and children.
Rose is more complicated
For this craft you need a square of paper, no larger than 10x10 cm. The sheet is folded in half.

Then in half again.

The top side of the paper is flattened into a triangle.

Now the workpiece needs to be turned over. And on this side, fold the paper into a triangle, as before.

The right and left corners on one side are bent upward, into a rhombus.

These same corners are bent in half downwards and unbent back.

The small triangles that make up the rhombus need to be flattened, like this.

Bend the resulting pockets in half, down.

Do the same on the other side. It will turn out like this.

Bend the top corner down, making a fold and bend it back.

Open the lower part of the blank like a book.

Attention! Pull the areas shown in the picture and flatten. You should end up with two triangles in a square.


Turn the workpiece over.

Lift the triangle up by pulling it.

The lower right square must be folded diagonally, from top to bottom.


Turn the workpiece 180 degrees and bend the lower right square again.

Place the almost folded flower on your left hand. Grasp the walls of the workpiece with your right hand and twist clockwise. The result will be a rose. You can also help with your left hand. Wrap the corners around the pencil, twisting them slightly.
This is what the flower will look like:

It looks good on a scrapbooking-style card, on gift wrapping, or in a glass vase where you can place several roses of different colors at once.
Model from modules
This option is more complicated, but the flower looks very delicate and beautiful.
You need to prepare squares of colored paper, 8 or 15 pieces, depending on how many layers there will be in the rose, two or three. And also glue, because this is a modular assembly.
The square is folded in half, a fold is made and the sheet is unfolded back.

Turn the angle up like a diamond. Take the right corner and fold it inward, along the line of the fold made before.

Also bend the left corner.

Using a pencil, twist the corner a little. The petal module is ready.

The first row is made up of 3 petals. You need to apply a drop of glue to the left corner of one petal and the right corner of the other.

Like this:


Now the three glued petals need to be connected into a circle. Like this.


The first row is ready.

The second row consists of 5 petals. First glue at the top, then turn it over and glue at the bottom.


This is what the inside looks like after connection.

And so external.

Connect in a circle.

For the third row you need 7 petals and it is assembled in the same way as the second. It turns out that there are three such blanks.

These three rows must be connected to form a flower, starting with the smallest one. Thus.


This is the miracle that results.

What a beautiful rose flower! And how nice it is to be able to assemble it with your own hands, isn’t it?
Video on the topic of the article
Here you can watch a selection of videos about making other types of roses, in particular the famous Kawasaki rose.
The art of folding paper crafts without using scissors and glue is called origami. It came to us from Japan and quickly gained popularity. The technique of folding paper figures can be learned by both adults and young children. The most popular is the origami paper rose.
The popularity of the paper rose is associated with the widespread love for this flower. With a similar craft, you can decorate a postcard or photo frame, or make a beautiful colorful panel that will give you a good mood in the cold winter. From several roses you can weave a wreath for your daughter’s holiday, or make a bouquet or composition for interior decoration.
In order to understand exactly how to make a rose from origami paper, you need to study the diagrams. For beginner paper craft lovers, there are instructions on how to make a rose or other flowers step by step. So, before you make origami from paper flowers or roses, you need to prepare the following materials:
- Office, corrugated, crepe, colored or white paper. The main requirement is the ability to keep its shape and not tear when bent.
- Schemes (for classic origami).
- When working in pattern technology, use ready-made diagrams and printed drawings. It is best if these drawings are printed on a color printer.
- Pencil, scissors, PVA glue to secure the product. Wire for twigs or dry tree branches.

First models
The simplest model is a rose made using the paper rolling technique. A beautiful flower is made quickly, even a small child can assemble this craft. Let's look at how to make a rose step by step.
Step one.
Fold the corrugated paper into several layers.
Step two.
Cut off two corners on one side of the resulting ribbon. Make a cut in the shape of a petal.
Step three.
The resulting blank can be screwed onto a pencil or twisted by hand.
Step four.
Secure the rosette at the base with tape or glue.
Origami paper rose is one of the most popular crafts all over the world. It is done quickly according to the presented scheme:

Take a standard A4 sheet of paper. Cut into even strips. The width of the strip depends on the desired size of the rose. Usually, paper 1 - 1.5 cm wide is taken. Paper strips must be folded diagonally. You can create several roses from one sheet. Decorate the finished flower with rhinestones or glitter varnish.
The resulting flowers can decorate a gift box, or you can make a beautiful bouquet if the buds are connected with wire wrapped in green paper.
Origami paper rose for beginners and patterns are widely presented in a variety of master classes. The technique of folding according to a pattern, that is, a ready-made drawing, is very convenient for getting acquainted with origami. For those who are just mastering paper crafts, folding according to a pattern will help to correctly assemble the desired figure and instill the skills of folding a paper product.
Available rose models
After mastering paper rose origami step by step, novice craftswomen move on to more complex schemes for creating everyone’s favorite flower. Fresh flowers, unfortunately, are short-lived. To add individuality to the interior, they often resort to decorating with paper and flower arrangements. Such compositions look beautiful.

Creating beautiful crafts with your own hands is not only a useful leisure activity, but also an expression of creativity. The origami rose ranks first in popularity among handmade paper flowers. The colorful flowers are fairly easy to make if you follow the step-by-step instructions. The result of the work is visible after a short period of time.
The colors of roses have always impressed with their diversity, so you can use any color for crafts. Most often, paper leaves measuring 10 x 10 cm are used for roses. The result is a medium-sized flower.
You can assemble the following rose model in about 10 minutes, following the diagram:
- The square sheet is folded in half. Fold the resulting rectangle in half.
- Carefully open the upper side of the resulting square from left to right to form a triangle. Turn the workpiece over and repeat all the steps on the reverse side. There should be a workpiece triangle in front of you.
- In the resulting triangle, fold the lower corners of the upper part of the workpiece towards the center line. You've got small triangles. Open them so that a square comes out.
- Turn the workpiece over.
- Bend the lower sides of the upper triangle symmetrically towards the center line.
- Bend the resulting upper corner towards the center point of the bottom line of the triangle, straightening it.
Now carefully follow the presented schematic instructions:
Do not take thick paper for the first attempt; it is better to take soft corrugated paper or a set of colored school paper. Until you learn how to tightly fix the folds of the craft, soft material is best suited for creativity.
The rosette is assembled according to the pattern according to the finished drawing, where the fold lines are specially marked. Solid lines are the fold of the valley, broken lines are the folds of the mountain. Print the finished diagram on a color printer or transfer it to colored paper using tracing paper.
Here is a step-by-step collection of roses using a pattern.
Step one.
Fold the diagram like an accordion, fix the lines, and then unfold the sheet.
Step two.
Fold the triangles inward along the marked lines.

Step three.
Along the folds of the mountain, the triangles must be folded down.
Step four.
Fold rows of triangles along the auxiliary lines until you have collected all the triangles.
Step five.
After the entire paper figure has been assembled, carefully open the resulting triangles using a pencil or scissors.
As a result, you will create a magnificent flower:
Rose - cube
The most unusual origami rose model. The rosette can be transformed into a cube or the cube can be transformed into a beautiful flower. A very beautiful original gift. For the craft, you need to prepare 3 square sheets of green and red flowers. The flower may be pink or yellow. This cube looks beautiful with the contrast of colors.

Usually it takes about 30 minutes to create such a gift transformer. For those who are trying to make such a craft for the first time, the main thing is to understand the scheme for creating a rose-cube. Speed will come after several assembled products. If you follow the assembly rules, you will get an excellent cube rose.
This craft is assembled from six separate modules: 3 green and 3 red. To work, you need sheets measuring 10 x 10 cm. First, we assemble the modules.
Step one.
The square sheet is folded in the middle. A line is formed. Unfold the sheet. We bend the opposite edges of the sheet towards the middle and again form a line. You will end up with something like this:
Step two.
We form new fold lines. Fold the lower right corner up to the top fold line. We do the same with the opposite corner of the sheet.
Step three.
Fold the right corner at the bottom, aligning the edge of the sheet with the visible vertical fold. Fold one fold to the right. Following the fold line, align the bottom of the corner.
Step four.
Turn the workpiece over. Do the same operations with the opposite direction angle.

Step five.
Turn the workpiece over again and bend the corners of the module.
Step six.
We form a square by bending the corners on both sides.
Make 2 more modules this way. Set the finished 3 red cube blanks aside.
- Take green leaves. We repeat steps 1 to 5 inclusive without changes.
- We bend the upper corner on the right as in the picture.
- Turn the workpiece, then bend the corner in the same order as in the red workpiece.
- The modules have holes where you need to insert a long corner. First, we assemble 3 modules of the same color, then the second, after which we connect the two halves of the cube.
- To turn a neat little cube into a rose, you need to follow these steps: pull out the short green corners and unfold them. This is how rose petals are made.
- To form a rose bud, pull out the bottom corner from the fold on three sides. The upper corners extended in the same way will add splendor and volume to the rose.
The wonderful kusudama ball made of individual modules also belongs to easy origami models. This craft is made from many simple origami roses fastened together. Many craftswomen love such products for the opportunity to show their imagination, surprise others, and decorate the interior of their home.

To assemble the modules, in addition to paper, you will need glue and 6 paper sheets. Modules can be the same color or can be combined from 2-3 harmonious shades. A kusudama ball is assembled from several roses. The flowers are carefully glued together with side leaves. Such a ball can be hung on a Christmas tree or decorated with several flower balls in a children's room.
Rose Kawasaki
A beautiful classic Kawasaki rose is assembled by experienced craftsmen without any diagrams. For beginning craftswomen, this flower is quite complicated, but the resulting result will justify the time spent.
The most difficult thing when creating this product is the formation of folds. You can find ready-made drawings and assemble a flower according to a pattern, however, many people prefer to make this model themselves. Before you start working, you need to familiarize yourself with several master classes and watch video tutorials that show you step by step the process of creating a delightful beauty.
Be sure to familiarize yourself with the folding technique. Try to form mountain folds and valley folds on separate sheets. This skill is very useful in creative origami works.
The Kawasaki rose is the closest thing to a real living flower.
Karina is a regular expert on the PupsFull portal. She writes articles about games, pregnancy, parenting and learning, child care and the health of mother and child.
Articles written
According to legend, the rose did not yet have thorns... Such beauty is easily made from paper. A ready-made flower without thorns that will not fade and will become an original gift for a loved one. To make an origami paper rose, follow the step-by-step instructions.
For beginners, it is better to choose the easy way to learn the basics of the procedure.
Origami paper rose for beginners
The process consists of several interconnected stages. The first is the preparation of lines (or stripes, depending on the scheme). This technique creates a foundation for folding. The sheet of paper will need to be turned over 3-4 times in a special way, following the instructions. The second stage is folding.
What you will need:
- a sheet of paper (office, corrugated, special colored);
- origami diagrams;
- pencil;
- scissors;
- PVA glue or glue gun (for fastening);
- scissors;
- wire (if necessary).

It is better to start mastering manufacturing with simple patterns, so that even a child can independently make a rose out of paper - origami. Some techniques allow you to make crafts without using glue or other additional materials.

Rolled paper rose
Take a sheet of paper prepared for the craft.
Cut the sheet into 2-3 equal long strips. Remember, the width of these strips determines the size of the future flower (the wider, the larger the rose). It is better to do 1-1.5 cm.
Bend the finished strips carefully diagonally. So from an A4 sheet you will get 2-3 (or more) colors.

If you want to additionally make a branch for the finished rose, take a separate sheet of green paper (corrugated or thick colored paper will do). Cut the sheet into 2-3 long strips. Let them be 10-15 cm in width. Make sure that the length of the strips matches the size of the flower. Preferably 15-20 cm. If the flower is small - 10-12 cm. Fold and seal the edge with PVA glue.

Cut the leaves separately and glue them to the finished branch.
Carefully glue a rosebud to the end of the resulting branch. The method is considered simple and can be done quickly.
Origami rose simple
Master class on making a simple rose without diagrams. For beginners, medium-hard, corrugated, office or colored paper is suitable for testing. Trim off the excess strip to create a square sheet.
Fold the paper in half first. Carefully fold the resulting rectangle in half.
Open the top side of the square, following the direction: from left to right so that you end up with a triangle. When finished, turn the workpiece over. Fold the other side of the square in a similar way. The result is a triangle.
Fold the bottom corners of the resulting triangle, following the center line. Instead of one, there are now two identical small triangles. Open and straighten the craft - you will get a square again.
Turn the workpiece over. Fold both lower sides of the upper triangle symmetrically, following the direction of the straight center line.
Bend one upper corner following the direction of the visible center point from the bottom line of the triangle. Spread out the sides.
Origami rose - transformer
The result is not a rose, but a masterpiece. One sheet is enough to make the craft. The finished rose is transformed from a volumetric cube and back.


Required:
- thick paper of 2 colors (for example, pink and green);
- scissors;
- ruler.
The procedure seems dreary and complicated, but if you follow the instructions step by step, everything will work out. There is no need to take 2 colors, one A4 sheet is enough. It is cut into several identical squares (9x9 cm). But it’s better to take 2 colors, it’s easier to make an origami rose.


Fold the square in half. Fold both halves in half one by one so that the folds are on one side.
Fold the upper right corner, focusing on the first fold on the left. Iron it.
Fold the bottom right corner as well. For convenience, you can unfold the workpiece, then the corner will be on top. To the three straight folds on the paper, two diagonal ones were added.
Fold the bottom corner on the left, aligning the cut of the sheet so that it matches the small fold on the right.
Align the top cut by pressing it with your finger, and then secure the resulting open pocket (see photo).


Turn the piece upside down. Repeat the manipulations with the small lower corner on the left. Just look, push the corner downwards from the previously made corner.
Iron the fold, following it until it intersects with the vertical fold on the right, as you have already done.
Repeat the manipulations to get another fold.
Turn the workpiece over. Carefully fold the corners. Fold the bottom right corner and the top left corner.
The result will be a square with several corners. Fold the remaining sheets (pink) as well.


Green squares must also be folded until pockets are formed. The step-by-step instructions described above will help. Fold the small corner at the bottom, located on the right. Immediately bend the resulting corner upward.
Rotate the workpiece up to 180 degrees and repeat the steps described above, taking the bottom corner on the left. The result will be a blank similar to the pink one, only with a folded corner.


Turn the workpiece over. Bend its upper corner looking like the pink ones, then the lower corner.
At first it seems that making an origami rose out of paper is very difficult and time-consuming. But in the end you will get a paper cube that will transform into a beautiful little flower.
Connect the green parts. Hold the first (left) part so that the small corner looks up, and the longer corner looks down. Insert the second (right) piece at a long angle into the groove.
Turn the third part and carefully insert the long corner into the groove from the second part. Insert the long corner from the first into the groove from the third.
Follow the description and check the pictures. Try to ensure that the diagonal slots of the three parts form a triangle.


Collect pink ones. Again, insert the long corners of these parts one by one into the open grooves. Look at the slots. You can see how the slots radiate beautifully to the sides from the top.
Let's connect. Carefully insert the long corners from the pink ones into the open grooves of the green ones. Don't touch the short corners. You will get a small cube with short corners sticking out. Open the green ones.


It is more difficult to open the petals. To make the flower beautiful, act carefully. It seems that the craft was assembled incorrectly. The petals just hold on tighter. If it doesn't work with your fingers, take something sharp.


Life style