We will show you and describe step by step how to make a paper tank with your own hands. This tank model is the most popular. To make a paper tank with your own hands you just need a sheet of A4 paper and scissors.
Instructions for making a paper tank with your own hands.
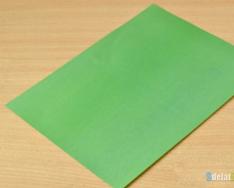
First, let's prepare everything you need for origami, namely two sheets of paper, first A4, format 30x21 centimeters, second 5x3 cm and scissors. You can also take colored paper. In this case, your origami will immediately take on a unique look.
1. Place a large sheet of paper in front of you as shown in the photo.

2.
Fold in half, along the long side. 
3.
Bend and then straighten one corner first. 
4.
Then do the same with the second corner. 
5.
Do the same on the second side of our sheet (steps 3-4) 
6.
Next, we need to carefully bend both sides so that on the fold line there is a central point formed from two diagonal lines. For clarity, you can look at the photo. 
7.
Fold the corners inward along the fold lines. There are 8 corners in total. 
8.
We place the figure in front of us and bend the top corner down on each side. 
9.
Fold the top of the workpiece until it touches the center line. 
10.
Fold the same strip in half, bending the bottom edge up. 
11.
Then we bend the corners in the other direction so that they don’t interfere with us for now. We do the same as described in paragraphs 9, 10. 
12.
Bend the corners in different directions as they were originally made. 
13.
Place the figure on the table as in the picture. Fold the top corners in half. 
14.
Turn the tank model over to the other side. 
15.
Fold the layout into a ring. Our figure should be fixed, and the large angles should be on top. 
16.
We are making the turret of our tank. We tuck the large upper corners into the folds of the triangles located below. 
17.
As a result, we will get just such a paper model of a tank, only without a gun. 
18.
Now it’s the turn of the small piece of paper that we prepared at the very beginning of the master class. We make a tube out of it. 
19.
We install the cannon in the hole in front. We unbend the folds on both sides at the base, thereby creating caterpillars. 
20. Congratulations, you have made a paper tank with your own hands.
How to make a paper tank video.
Don't be upset if you don't get the craft right the first time. In this case, try again to go through all the stages of assembling origami. Now you know how to make a paper tank.
Don’t forget, we take criticism well, if you don’t like the description of any step in describing origami, leave a review in the comments.
Tatyana Gurova
The wheels are knocking, knocking,
Our the train rushes into the distance,
And the smoke from the locomotive -
Whitish veil.
Half the sky closed from us,
And the steam locomotive “Tutu-tu,”
It buzzes, “I’ll be here before lunch.”
I'll bring the kids.
I'll arrive at the station,
Without delay, on time,
Then I'll go to the depot,
And I'll sleep there for an hour"
I. Shevchuk
Take a sheet paper A4 format and fold in half

Then, unfold the sheet and bend both sides towards the middle

Form a rectangle and cut it out of the strip paper window, paste

Then we cut out the circles and also glue them on.

That's it, one trailer is ready. Other trailers are made using this principle.

When we did train, the guys cut out the windows themselves from strips paper, and the wheels are made of squares.

Publications on the topic:
A path runs through the meadow, dives to the left, to the right. Everywhere you look, there are flowers all around, and knee-deep grass. Green meadow, like a wonderful garden, fragrant and...
Making flannelgraph. Master Class. Lushnikova M.V. – teacher. I have long wanted to have a flannelgraph in my group, but I had to get plywood.
Late autumn has arrived. The earth was covered with an autumn carpet. This inspired me to create an autumn gramophone and write a poem Poem.
GOAL: development of creative musical abilities in children. OBJECTIVES: - to give an initial idea of the wide possibilities of noise.
For work you will need: scissors, colored crepe paper, a glue brush, glue, black cardboard, cardboard for a template, a board, a stick.
"Dedicated to the crazy people"
If your desires to build a model railroad exceed the capabilities of mass production, it’s time to think about making your own models. There are different materials and technologies - here we consider manufacturing from cardboard.
First of all, you should stock up on everything you need.
First you need good white cardboard (preferably 0.35 - 0.5 mm - determined by eye using a ruler).
You also need the right tools:
- mechanical pencil with a 0.5 mm lead,
- PVA glue,
- ruler 30 cm,
- corner,
- eraser,
- threads (preferably not very fleecy),
- transparent plastic, double-sided tape,
- two types of emery (coarse and fine),
- paper knife, regular scissors,
- manicure scissors,
- clothespins (preferably plastic with flat surfaces),
- and also some other little things, which will be discussed below.
And most importantly, you need a sincere desire to make a layout!
Here we will consider the production of a model on a ready-made chassis. As a donor, you can use cars from the TT-model or VTTV.
When producing any model, reference materials are required in the form of drawings and illustrations of the modeling object. To save time, I also used the DMV from the TT model.
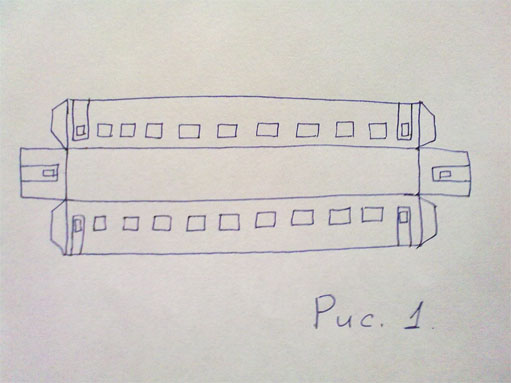
So, let's begin. If a drawing is used, then all dimensions must be recalculated to the appropriate scale, in my case - 1:120. Next, on a sheet of cardboard, you should draw a basic layout of the car WITHOUT a roof (the result should be an elongated parallelepiped without a floor) ( Rice. 1).
On it we draw everything that should be on the walls of the car, i.e. windows, doors, lines where there should be stiffeners, etc. After everything is drawn, we cut through all the windows with a knife.
Now it is necessary to increase the rigidity of the future body– on the back side you need to glue a second layer of cardboard with already cut windows onto the walls so that the windows coincide with each other ( Rice. 2).

Since cardboard has a bad tendency to swell when wet, you don’t need to spread a lot of glue, but quickly and thinly spread one side and immediately press it firmly and put it under a press.
Now let's deal with the stiffeners. They are made from threads that are glued along the drawn lines: first, an adhesive strip is applied, onto which the thread is then applied and pressed with a finger. The idea is to saturate the thread with glue and remove excess glue from the surface. Once all the ribs are glued on, it's time to outline the doors. To do this, cut a thin groove along the contour of the door with a knife. After this, we coat the cut out contours of the doors and the already glued threads. When everything has dried, you need to carefully walk over the surface of the threads with fine sandpaper and coat it with glue again. During all coatings, we try to leave as little glue as possible so that unnecessary irregularities do not come out later. Handrails are made from thin strips of cardboard.
Now it's time to start assembling. We press down the folds on the reverse side with scissors. Then we cut it out, carefully bend it and glue it together ( Rice. 3).

Carefully sand the rough protruding cardboard in the gluing areas.
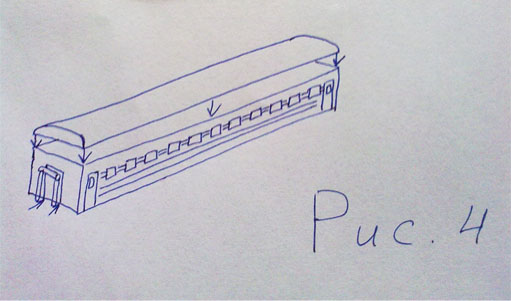
Roof. To get the roof of the desired shape, you first need to create a parallelepiped from layered cardboard, the height of which is equal to the height of the roof itself (usually painted gray). The width and length should be 1 and 2 mm greater than the width and length of the car blank, respectively (these are approximate figures). This is necessary so that after gluing the roof (by the way, it is also advisable to glue it using a press), it can be sanded on the sides and thereby adjusted to the size of the car. Next, the roof needs to be given a convex shape - to do this, draw the roof profile from the ends and cut off the excess longitudinally. After this, we sand first with coarse sandpaper, and then with fine sandpaper. After this, coat the roof with glue and wait until it dries. We process with fine sandpaper and repeat the operation. Now you can glue the roof. If you can find something to hold it down with while it dries, that will be good. If the original has stiffening ribs on the roof, they are made in a similar way using threads. We coat the junction of the roof with the body with glue. After this, air intakes can be attached to the roof. We glue cardboard at the ends of the car to hide the joint, although, depending on the situation, you can do without it. Using toothpicks, transitional soufflés are made ( Rice. 4).
Let's talk a little about the insides. First you need to make a floor from 2-3 layers of cardboard. Next, we mark on it a diagram of the partitions, which, after cutting, we “put” on glue. The total height of the interior with the floor should be selected taking into account the height of the chassis. We glue the upper shelves to the walls, but the lower ones will most likely have to be glued to the floor. After this, a strip of cardboard 1 cm wide and 2 cm long less than the length of the car is glued on top of the partitions.
Now you can paint. It is advisable to use water-indelible paints. You can use aerosol, regular oil or special model paints. Next we use tape and brushes of different sizes to obtain the desired color.
When everything is dry, we glue strips of transparent plastic on the inside of the walls of the car using double-sided tape. From the inside, we stick double-sided tape onto the roof, and then press the insides of the car to it. We again glue double-sided tape to the floor of the car from below and press the chassis to it ( Rice. 5).
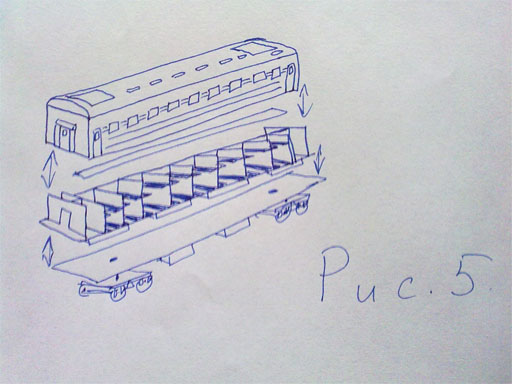
The car is ready!
Watch also the video on how to make a freight car out of cardboard.
2. You should have a fold in the shape of the letter X at each end of the rectangle. Now you should form each corner so that the result is a multi-layered triangle. To do this, you need to fold each of the two inner corners to the center of the letter X, bring the corners together and press them in a little.
3. For the second end of the rectangle, repeat the same steps. This should be done from the “wrong” side so that a double-sided arrow with sharp ends is ultimately formed, but these ends should be located in opposite planes to each other.
4. Bend the corners of the upper part of the “arrow” so that a diamond is formed on one edge, which is made up of two corners.
5. Bend one of the corners on the opposite side so that it connects with the bottom, and bend its edge upward. You will have a flap that needs to be bent in the opposite direction. Repeat the same action with the other corner. On this side, you will also end up with a diamond shape.
6. Place the product with the wide side facing you, lift its side parts and insert one part into the other. An arc is formed with paper valves attached to the top. The formed arc is your paper tank, at the top of which there is a real “tower”.
7. The tank is almost ready. All that remains is to add tracks and a muzzle (gun) to it. The missing parts are quite simple to make: bend the side edges of the tank and form tracks from them. To make a paper muzzle, roll up a tube and insert it into the hole in the “turret” of the tank.
Now the paper tank is done!
Also watch the video on how you can make other tanks out of paper!

If you use the knowledge on creating paper tanks from this article, then you will definitely succeed. Happy paper tank making!
Boys love a variety of equipment: cars, airplanes and, of course, tanks. If you have a future defender of the fatherland growing up, then a tank made with your own hands will be an excellent gift that will definitely delight your child. In this article you will learn how to make a paper tank with your own hands. You should start with the simplest model.
How to make a paper tank: the simplest technique
Take a regular A4 sheet and cut a strip 4–5 cm wide from the short side.


Take the strip and bend the top corner from left to right so that you get a triangle.

We unfold the corner on the strip to its original position. We bend the top of the strip in the other direction, also in the form of a triangle. And again we return the paper to its original position, after which we get clear fold lines.


Along the fold lines, fold a triangle at the top of the strip as instructed. Do the same at the bottom of the strip. Press the pyramids well from above and below to fix their position.


Now you need to bend the ears of the pyramids to the left; to do this, lift them up and then bend them in the desired direction. After this, fold the right edge of the strip inward towards the center.


Fold the ears of the top pyramid inward and fold the strip so that the top corner is parallel to the bottom pyramid. After this, insert one pyramid into another.


This is the figure you should get.


We bend the ears, open the top pyramid, and then tuck them inside.


Thus, we got a turret for a tank.

Take your figurine and turn its side towards you. Straighten the strip that is concave inward, this is necessary to give volume to future caterpillars. Do this carefully and from all sides.


All that's left is to build a barrel for the cannon. To do this, take a piece of paper measuring 4x4. Roll it into a tube with a thickening at the end. After this, slightly lift the tank turret and insert the barrel there.


That's all, the tank made of paper using the origami technique is ready. This craft can be made from any paper, but it will look best if you take a blank white sheet, and after you form the combat vehicle, decorate it. Or make a toy directly from colored paper.

Modular tank T-34
Before you start making such a tank, you need to understand in detail how to make the origami modules themselves.
To create such details you will need a regular A4 landscape sheet. But if you are making these parts for a tank, it is better to immediately take colored paper of a suitable color.
Fold the sheet in half, then again and again, in the end you should get paper with 16 squares, but if you fold the sheet again, you will get 32 pieces. Cut the sheet along the fold lines.


Take one of the resulting triangles and fold it in half diagonally.

Fold the resulting strip in half again, and then unfold the part to its original position.

Now fold one edge towards the center, and then the other, as if folding an airplane.

Turn the piece over and bend the remaining free corners into triangles.

The resulting segments need to be folded upward.

Fold the piece in half and the origami module is ready.


Now you can start creating the tank.
Tools and materials
- The paper is white or green.
- A ruler and a simple pencil.
- Scissors.
- PVA glue and a thin brush for it.
- Spray can with green paint.
For such a tank you will need 5088 modules, you can make them in advance or do it as you go. We begin assembly with the main part – the body.
Insert the corner of one module into the pocket of the other.

Take the third module and insert it into the pocket of the second.

We take the fourth module and insert the free corner of the third into it.

Insert the corner of the fifth into the fourth.

The long side of the body is currently being assembled. Add until you have 13 pieces in total.

Now you need to secure the structure; to do this, take another module and insert the corners of the first modules of both rows into it. In the photo it is marked in green.

Add 7 more modules in the same way, this will be the third row.

1st row – 30 modules
2nd row – 29 modules
3rd row – 30 modules
That's it, three rows are ready. Do not insert the modules too tightly, otherwise the part will not move.


4th row – 29 modules

Odd rows - 30 parts, and even rows - 29. You need to assemble only 100 rows.

Now you need to carefully connect 1 row and 100, this will be the body of the tank.

Tank side
Row 1 - 6 modules, and row 2 - 5 parts, respectively.

Alternate the modules as indicated above, even and odd. We make 60 rows.

The bead must be glued to the body; make the same bead for the second side.

Tank cabin
Don't forget what the short and long sides of the modules look like, you'll need this later.

We begin to make 1 row, it will consist of parts with a long side, and the second row with a short side.


To prevent your structure from falling apart, you need to secure it with a third row, a piece with a short side.


When the workpiece is ready, it needs to be connected into a ring. The corner of the part of the first row is inserted into the module of the second row; in the photo, the connection point is marked with green parts.


Do the 6th and 7th rows in the same way as the previous two.

Also continue doing rows 8, 9 and 10.

Turn the workpiece over, the cabin is almost ready.

Cabin cover
We collect in rows, with the long side. 1st row - 12 modules, 2nd row the same.

Connect into a ring, insert the corner of the module of the first row into the pocket of the module of the second row.


In the third row we need to increase the number of modules to 14. Place 4 modules, each on one corner, shown in green in the photo.

This is what the circle should look like.

Increase the 4th row to 16 parts, just as you did in the third row.


In the 5th row you need to get 20 parts, for this we put on 8 modules.


6th row – 24 modules, again we put on 8 parts.


7th row – 28 parts, 8 parts.

That's it, the cabin cover is ready.


Watch the video for the continuation of the master class:
And below there is a video that will show examples of how to make a Tiger tank out of paper, and not only.
A simple paper version.
Model KV-1:
Dream Interpretation